

Blog
want to take a crack at your problems from home? Check out our blog posts and find the topics specific to you
Topics:


Running with lower back pain
‘Don’t do that, it’s bad for your back’
Have you ever been told that?
What if I told you… running is good for you?
Lower back pain is one of the most common injuries out there. As many as 8/10 people will have lower back pain in their lifetime.
That is practically everyone!
There are a lot of runners who have lower back pain. You probably even know some. But… what if I told you that running is not only safe for your lower back, it may even be protective???
Let’s look at why…
How common is Lower Back Pain?
Lower back pain is EXTREMELY common. I guarantee you either have lower back pain or know someone who does (PSA: if you don’t know anyone with lower back pain, you might want to work only our listening skills).
It affects 35-80% of people at some point in their lives, and as many as 50% of people with lower back pain with have chronic pain (multiple episodes of lower back pain), at a conservative estimate.
So then… common is lower back pain in runners?
On the generous side: 22% of runners will develop lower back pain. On the more optimistic estimate? as low as 1% of runners have lower back pain 🤯
By those numbers… that means that running is likely PROTECTIVE for your lower back, instead of bad for it!
Now… all pain is multifactorial. That means that a lot of things can contribute to your pain experience (sleep, stress, nutrition, family history/genetics, previous injury… you get the idea).
But physical activity and being overall healthy are likely protective against most types of pain. By that rationale, running is not only good for your overall physical and mental health, but it can also decrease your chances of developing lower back pain.
In other words, if you are thinking about starting to run or you’re a current runner and worried about running making your back pain worse, you have my permission to stop stressing about it.
Get you there and put some miles on those shiny new shoes!

But what if I already have lower back pain from running?
It happens. As we talked about above, your lower back pain likely is not CAUSED by running, but it may be aggravating to it.
The first thing I recommend is getting assessed by a clinician you trust (preferably one who works with a lot of runners). If you need some help, we are here. Start with a free consult and we will help point you in the right direction.
There are a few reasons why you might have lower back pain and why running might make it more irritated.
Here are some common causes of lower back pain among runners:
Lower back or SI joint irritation
Lower back muscle strain or muscle pain
Lower back disc irritation that gets worse with running
Poor hip, ankle, or knee function
Other things in life can also contribute to back pain, that don’t even have anything to do with running like:
Stress
Poor sleep
Inadequate nutrition or hydration
History of injury
Other conditions like obesity, diabetes, or metabolic diseases
Lower back pain is complex. It is probably the most complex condition that walks into my door. That is because human beings are complex. You aren’t just a runner. You are also a mom, an uncle, a boss, a volunteer, etc. All of the other parts of life contribute to your pain experience, and we can’t just isolate ‘the SI joint’ or arthritis as the sole cause of your symptoms.
With that said… let’s talk about some things you can work on to HELP with your lower back pain (even if they aren’t necessarily the sole cause).
what to do if you have lower back pain with running
If you ARE having lower back pain and running makes it worse, here are a few things we work on at our clinic to fix low back pain with running:
Hip Mobility
Core Strength
Ankle Mobility
Hip Strength
1) Hip Mobility
Improving your hip mobility can improve your ability to access your hips, and give the lower back a break. Try this stretch and exercise:
90/90 and Shin Box
2) Core strength
Side Bridge is probably the exercise that I give most often to runners. I consider it something of a panacea for most running pain and injuries. If your core endurance and strength is poor, your form will break down sooner. This can lead to earlier irritation of the lower back (or knee… or hip… or ankle…)
I recommend that all runners be able to hold this for at least 60 seconds, but 25 km+ runners hold it for 90 seconds and ultra and marathon to runners hold it for 2 mins easily
Here is hot to test your side bridge endurance:
3) ankle mobility
The body is connected, from the big toe to the base of the skull. Somethings working on your ankle mobility can improve function upstream (e.g. at the hips or lower back)
Here is how to assess your ankle mobility and a good ankle mobility exercise:
4) Hip strength
Not surprisingly, hip strength is VERY important for runners.
Here are two exercises I give my running clients and patients all the time
At the end of the day, there are many reasons you might have lower back pain with running.
If you want more guidance, we can help.
Start with a free consult and learn more about our custom Pain to Performance plans and our Super Runner program, to get you back to running unlimited by low back pain.

Author: Dr Mark Murdoch, Chiropractor and Co-Founder at Base Camp Sport and Spine in Vernon, BC.
Mark Murdoch is a Doctor of Chiropractic with a Master’s Degree in Sports Medicine.
Contact: drmurdoch@basecampclinic.com
Instagram: Base.Camp.Doc

Iliotibial Band Pain
IT Band Syndrome is one of the MOST COMMON running injuries. But it does not have to keep you out forever. Learn about what causes it and how to manage it.
The Iliotibial Band (ITB) Pain is a show stopper.
It is the number one cause of lateral knee pain in runners (i.e. pain on the outside of the knee), and can not only end your running season, but it can also interfere with your everyday life.
If you have ever experienced ITB pain, you know how frustrating it can be.
In this article, we will cover what the ITB is, why it’s important, how it gets hurt, and some management recommendations.
What is Iliotibial band pain? And what even is the IT Band?
The IT Band is a length of connective tissue that connects your pelvis and your knee, running along the outside of the thigh. It helps make you more efficient while running by preserving the energy produced when your foot hits the group and reusing it for your next step.
Where the IT Band attaches at the knee can become irritated in many runners. This happens when you either increase your running volume too fast, spend too much time running downhill or run with a really narrow gait. It is particularly prevalent in trail runners because the trail forces our gait to narrow and we tend to spend a LOT of time running down hills (it IS my favourite part of trail running, after all!).

Once IT Band pain starts, it is really hard to get rid of, for a lot of reasons. Primarily though, it is because most runners follow this pattern:
Initial Injury happens
>Offload the tissue by decreasing your running volume.
>>Tissues lose capacity and your fitness goes down, but your pain decreases.
>>>Runner returns to their same activities as before, without properly rehabbing their knee.
>>>> Reinjury… and the cycle continues.
To prevent recurrent knee pain from the IT Band you HAVE TO BREAK THE CYCLE of Injury-Offload-Reinjury.
The good news is that IT Band pain doesn’t mean anything is DAMAGED. It just means that the knee is IRRITATED.
Management and Rehab of Iliotibial Band Pain
So… what should you do about IT Band Pain?
IT Band Pain management takes place in 3 Steps:
1) Calm Stuff Down
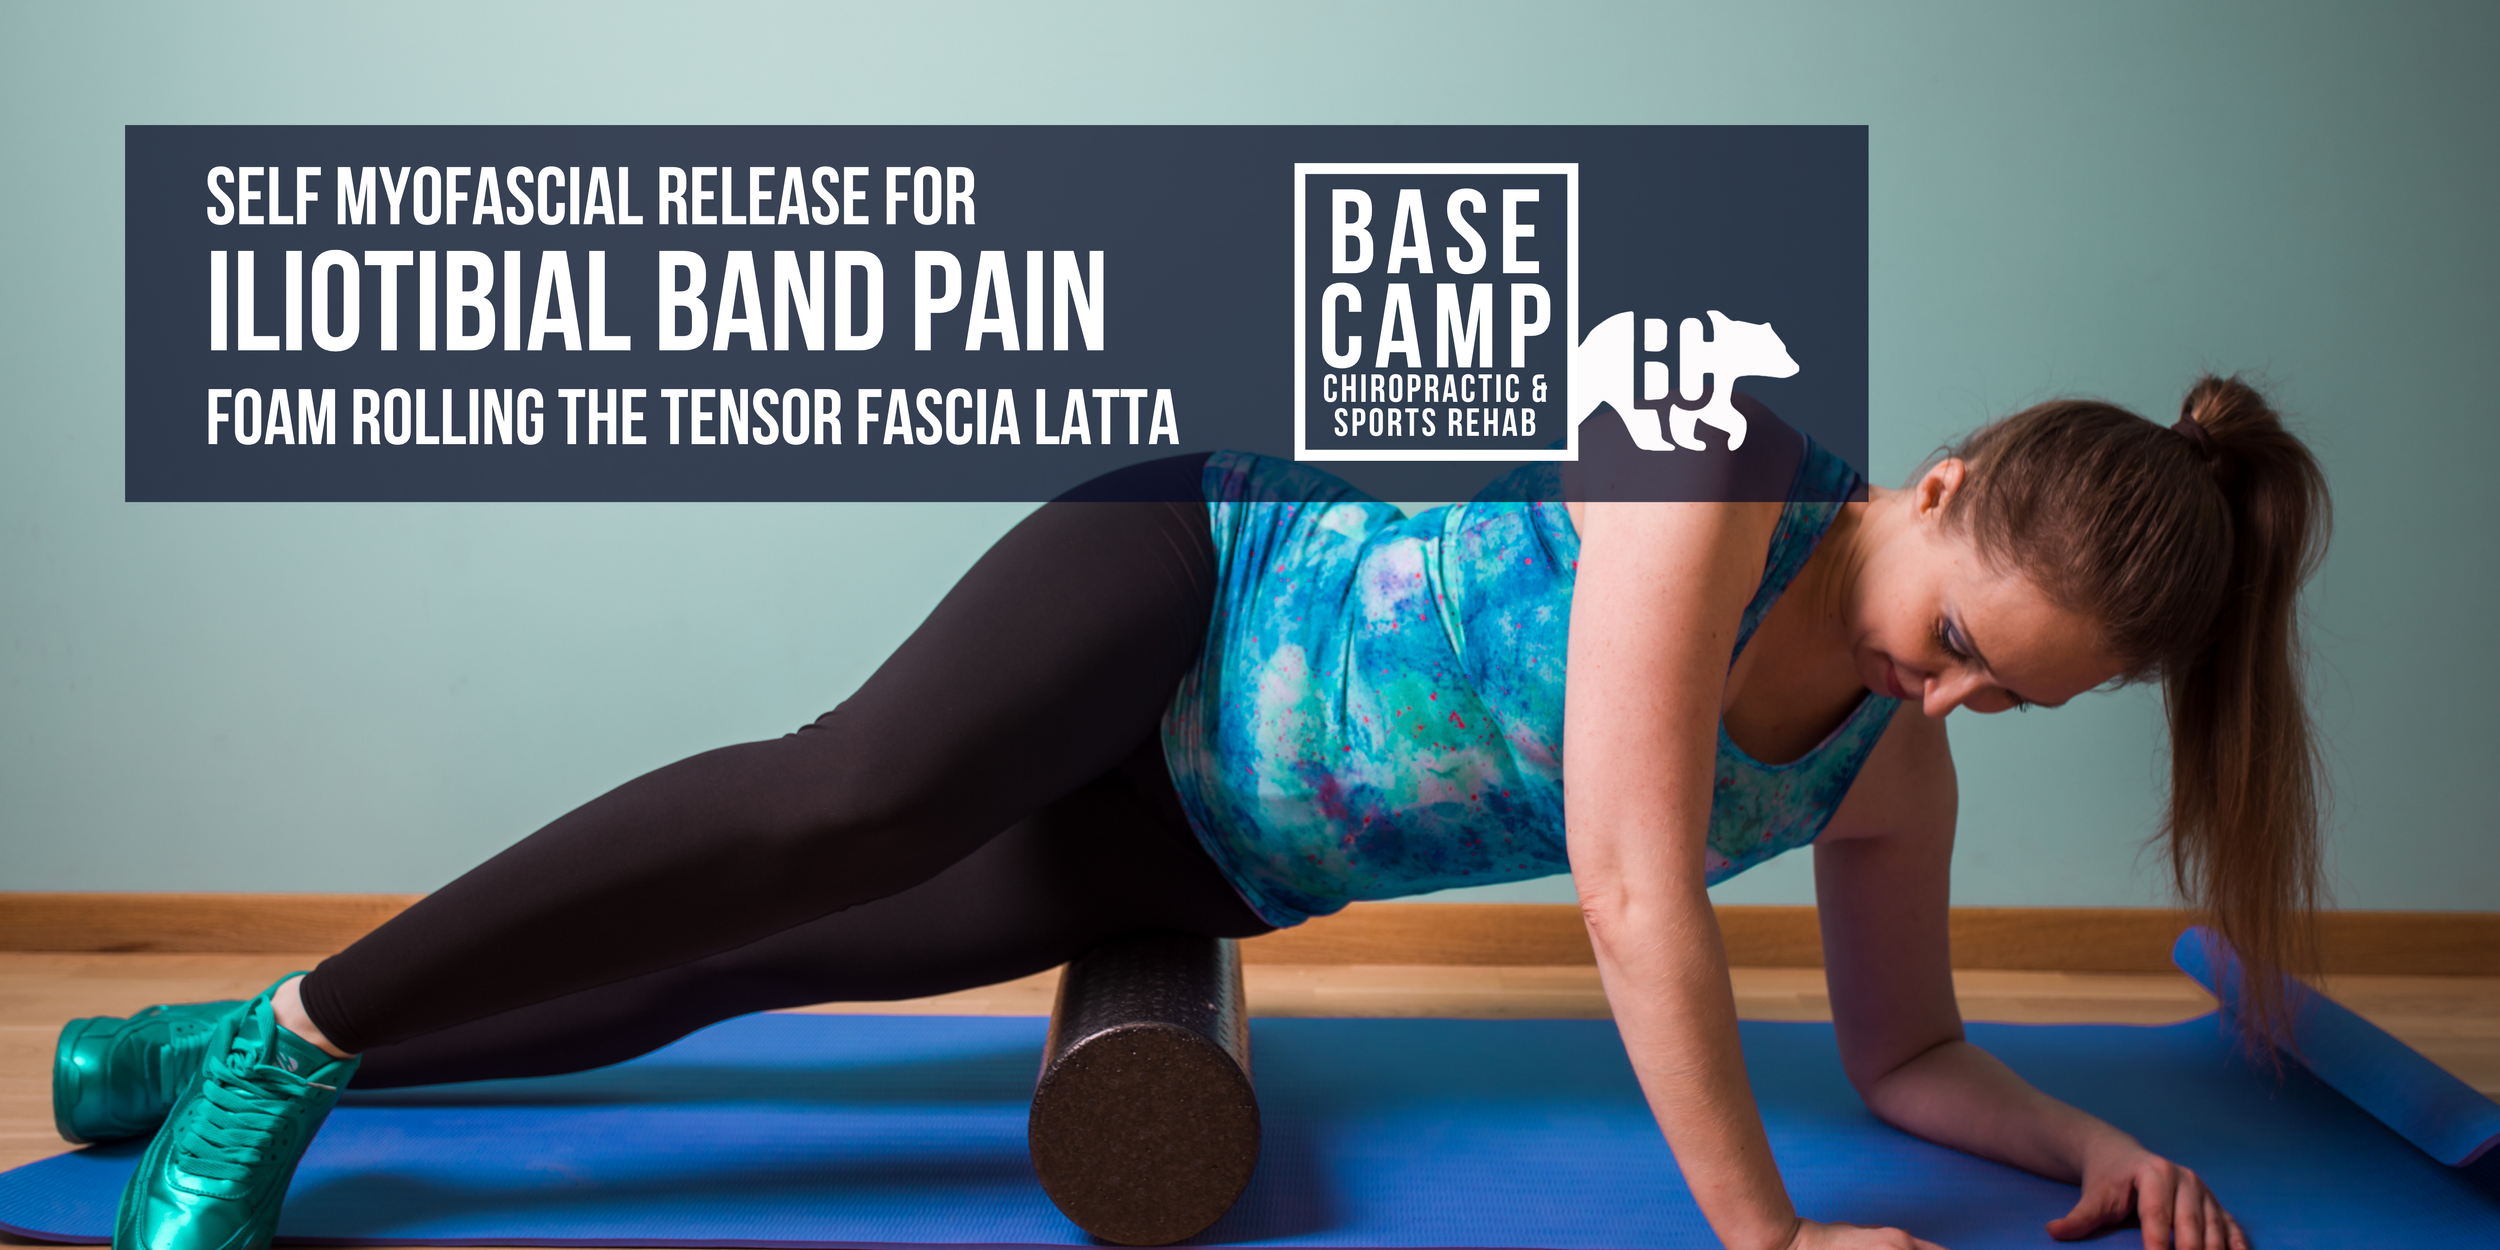
The nature of running injuries means that RUNNING VOLUME was the primary cause of the injury. This means that a temporary decrease in running is necessary to help calm down your symptoms, and your pain sensitivity. In the case of IT Band pain, this means avoiding running downhill. Some people can tolerate running on level terrain or using a treadmill on an incline. This helps keep your fitness up while rehabbing the injury.
During this phase we also use foam rolling, stretching, and manual therapy to decrease your pain and keep you as active as you can be. Here are some helpful videos:
Once things have calmed down (usually 2-6 weeks), then we can move on to Step 2 and Build Back Up.
2) Build Back Up

During this phase, we use exercises to increase your strength and tolerance to loading the knee. Here are some of my favourite exercises for rehabbing IT band pain:
Rear Foot Elevated Split Squat: VIDEO
Side Bridge: VIDEO
Box Step Downs: VIDEO
Lateral Lunge: VIDEO
3-Direction Calf Raises: VIDEO
This is just a short list of some of the things we use during the Build phase, but they are the foundation for most of the IT Band rehab programs I put together.
3) Bridge the Gap (getting Back to Running!)

This is both the most fun and most frustrating phase of IT Band rehab because you are going to want to jump back in and hit those trails you were running before the pain started.
This stage is different for each person, depending on their individual needs.
Stage 3 is a gradual process. How Stage 3 goes depends on how patient you can be. It is natural to want to jump back into running the same routes for the same distances at the same pace as you were before the injury. But what we want to do is gradually build your running volume back up over time instead.
If you can do that, not only will you be more successful at rehabbing your injury, you can actually become a faster and stronger runner than you were before the injury.
It is normal to have some bad days, where you feel like you are back to Stage 1. What we want to avoid is multiple consecutive days of flare-ups. Running volume management and terrain choice are essential at this stage.
Author: Dr Mark Murdoch, Chiropractor and Co-Founder at Base Camp Chiropractic and Sports Rehab in Vernon, BC.
Mark Murdoch is a Doctor of Chiropractic with a Master’s Degree in Sports Medicine.
Contact: drmurdoch@basecampclinic.com
Instagram: Base.Camp.Doc

Is your Breathing on Point?
How to check if your breathing is optimized for performance
As a Chiropractor in Vernon, I see a lot of runners. I am sure this is the same for most Vernon Chiropractors and Physiotherapists, but this is something that is often overlooked. In this article, Dr Alex Hueston shares his experience transitioning from road running in his training to a trail race.

Written by Dr. Alex Hueston. Chiropractor at Young Health Management in Duncan, BC (Vancouver Island). www.younghealthmgmt.com
Breath in, Breath out . . . Sounds simple right?!
Yes and no. Today in this post we are going to talk about the power of your breath and how in my chiropractic treatments I use breathing techniques to help a lot of my patients with various types of pain.
When we are talking about breathing we can divide breathing into two categories: diaphragmatic breathing and accessory breathing. Accessory breathing refers to the use of the accessory ventilation musculature (scalene, the sternocleidomastoid, the pectoralis major, the trapezius, and the external intercostals). This type of breathing is designed to be used in physically and emotionally stressful environments.
How do I know if I am breathing with my accessory muscles?
When these muscles are used, we will see the chest and shoulders rise. This may be why when we get scared we get the feeling our heart is jumping out of our chest as we are likely rapidly recruiting these muscles. With the rise in chronic stress in the population, more and more people are breathing via stress pathways leading to tension-like symptoms in their upper back, shoulders, the neck that can even cause headaches called tension headaches.

How can I improve my breathing?
The good news is there are many health disciplines that can coach people with their breathing from chiropractors and physical therapists to kinesiologists and yoga instructors.
Today I am going to go through a step-by-step strategy on how to perform diaphragmatic breathing. With the use of diaphragmatic breathing, we can see a potential decrease in heart rate and blood pressure, relaxation-related hormonal changes and improvements in core stabilization.
Let’s get started!
Step-by-Step Diaphragmatic Breathing
Beginning Diaphragmatic Breathing
Start by lying down on your back in a comfortable position. You may have your head and legs supported if you prefer.
Place one hand on your chest and the other hand over your belly button.
Inhale through your nose, draw your breath down to your stomach and you should feel your stomach/abdomen push up into your bottom hand while your chest remains still.
Exhaling you should then feel your abdomen drop back down to the floor while your chest continues to remain still.
Repeat this sequence for up to 5-10 minutes at a time. You can perform this exercise multiple times a day.
Advanced Diaphragmatic Breathing
If you can have been performing the above breathing exercise, I encourage you try advancing to what I call “360-degree breathing”
Breathing Into Your Sides
Lying down as you were previously, place your hands now on the lowest rib at your side so your thumbs and pointing towards your back and your remaining fingers are pointing towards your belly button.
When inhaling, visualize and feel your abdomen push out into your hands while your chest remains still.
When exhaling, bring your abdomen back to the starting position.
Perform this for at least 10 consecutive repetitions
Breathing Into Your Back
Lying down as you were previously, place your hands now so they are behind your back between your hip and ribs
When inhaling, visualize and feel your abdomen apply pressure on your hands increasing the pressure of your back on the floor. Make sure your chest remains still.
When exhaling, release that pressure and return to the starting position.
Typically this is easier to feel with a longer, deep breath.
360-Degree Breathing
You have now felt all the directions your breath can move through diaphragmatic breathing and now it is time to try to breathe into all these directions at once.
If you need feedback it may help to loosely put a belt around the level of your belly button. When inhaling, visualize putting equal pressure on the belt from all directions. Again the chest should remain still throughout.
Practice, Practice, Practice
Like all exercises, breathing takes patience and consistent practice to build up a mind-body connection. The more often you practice on your breath, the more natural it will become and the more often you will find yourself using it in your daily life.
I hope this exercise helped you today and if you are looking for help with your road to recovery book an appointment for an initial assessment and treatment with myself or another member of the Young Health Management team.

Author:
Dr. Alex Hueston is a Chiropractor in Duncan, BC at the Young Health Management clinic. www.younghealthmgmt.com
How running injuries happen